About This Mathri Recipe
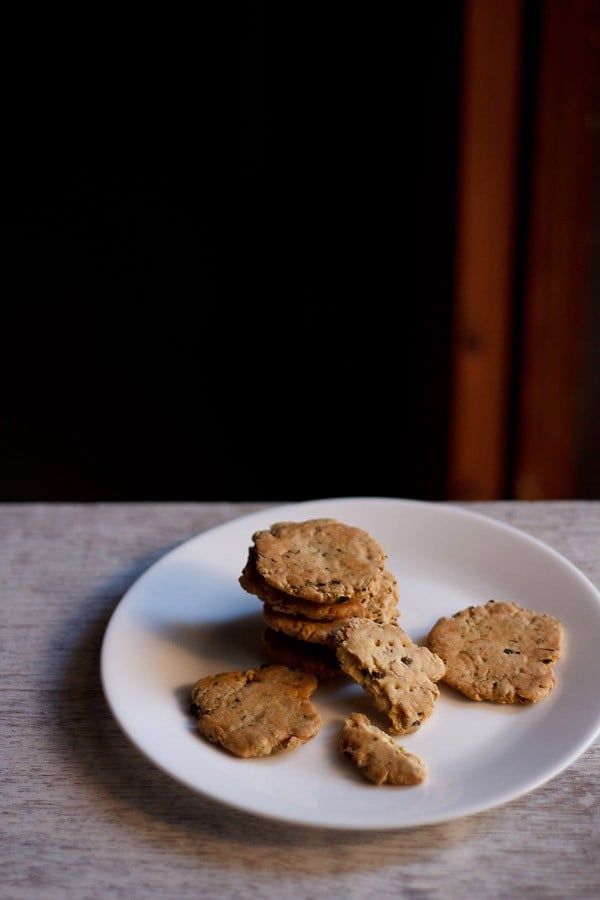
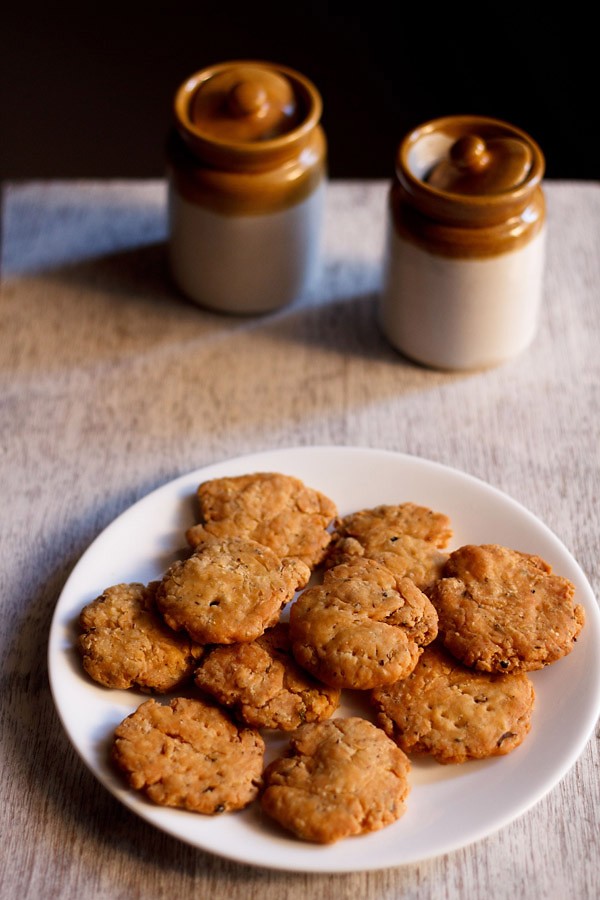
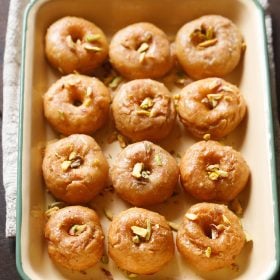
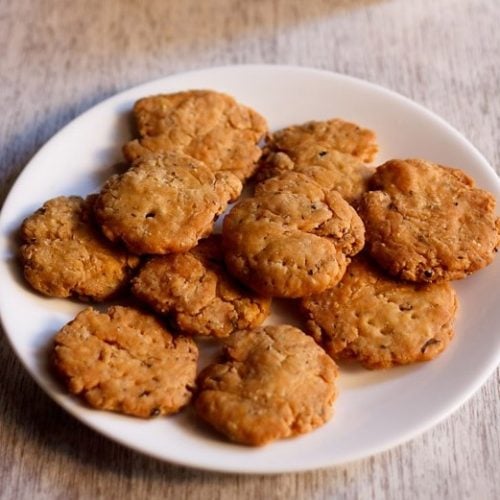
This recipe is for a traditional Punjabi style mathri which is flaky (khasta in Hindi) and flavored with carom seeds (ajwain), black peppercorns, dry fenugreek leaves(kasuri methi) and cumin seeds. In my recipe I have used both all-purpose flour (maida) and whole wheat flour. Many people like to have these spiced flour crackers having a savory, salty taste with their evening tea or as a snack to munch on. Once made in bulk you can store them in an airtight container at room temperature and enjoy it for the next few weeks. So the shelf life is long. I share here both both fried and baked mathari. For the best crispy and flaky texture, the fried mathri is definitely the winner, but the baked one is good too. They do not become deeply golden like the fried ones and have a faint dense texture. But are good for a low-fat option. The first photo above is of the baked mathiya and the last photo below is of the fried mathri. The baked mathiya are flaky but lesser as compared to the fried ones. I usually make mathri or mathiya for the occasion of Karwa Chauth vrat. In Punjabi families, the ladies break the rigorous vrat or fasting by eating mathri. You can check more about this vrat in this detailed post of Karwa Chauth Vrat Recipes. You can also make this recipe for festivals like Diwali or Holi.
How to make Mathri Recipe
Making Mathri Dough
Before you begin, let me tell you that this mathri recipe makes for 30 pieces, but can be halved to make a smaller portion or doubled to make a big batch. Also keep in mind that if you plan to bake mathri from the entire dough, then consider adding 1 to 2 tablespoons more oil or ghee to the flours.
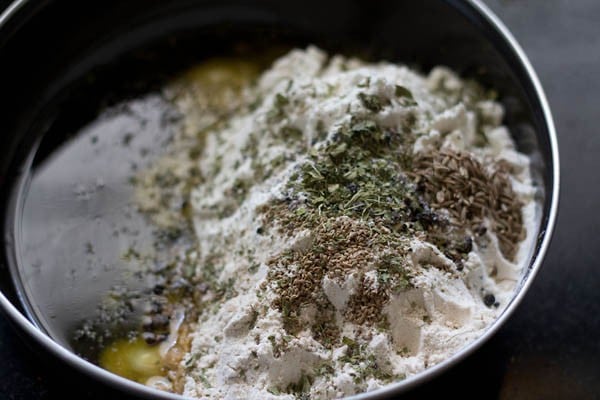
- First heat 3 tablespoons ghee or oil until hot. Take the hot ghee or oil (known as “moyen” in Punjabi language) and the following dry ingredients in a large mixing bowl:
2 cups all-purpose flour (maida)½ cup whole wheat flour (atta)2 teaspoon carom seeds (ajwain)2 teaspoons black pepper (kali mirch) – crushed coarsely or kept whole2 teaspoons – dry fenugreek leaves (kasuri methi), crushed – optional1 teaspoon cumin seeds (jeera)1 pinch asafoetida (hing) – optional1 pinch baking soda – optional, do add if baking the matharisalt as required
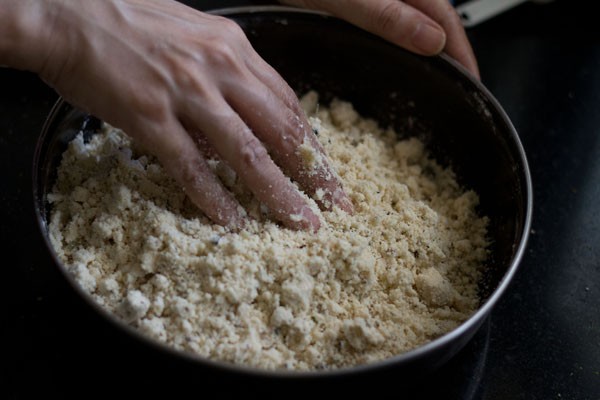
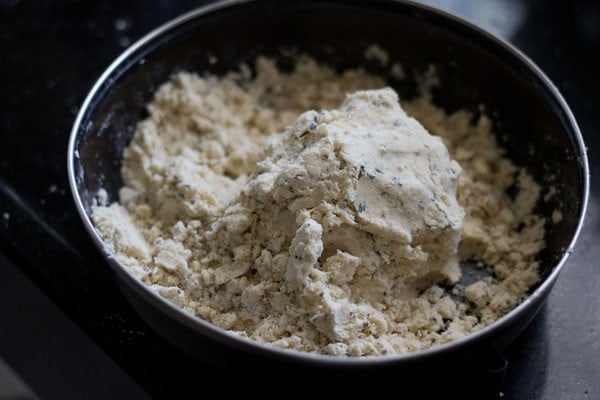
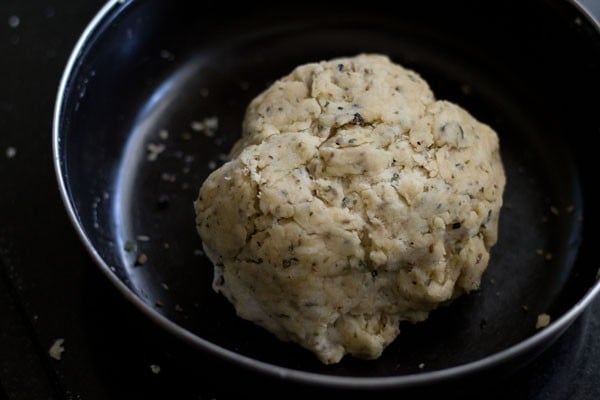
To make masala mathri, you can add a few ground spices like ¼ teaspoon turmeric powder, ½ teaspoon red chilli powder and ¼ teaspoon garam masala powder (optional). 2. First mix everything well with a spoon. Then when the mixture is warm or cool enough to handle, mix the fat evenly in the flour with your fingertips. The whole mixture should resemble breadcrumbs. The more you do this, the more better texture the mathri will have. 3. You will see the mixture can be gathered together like shown in the photo below. When you hold this mixture in your fist, it should not crumble and form a lump. If you get at this stage, then move to the next step. 4. Add 1 or 2 tablespoons of water each time and mix it. Combine the water with the flour mixture and mix only. Don’t knead like a roti or poori dough. Only mix the water in the dough and bring it together. Make a firm dough (like in the photo below) and not a soft one. I have used 6 tablespoons water and this amount was enough to bind and bring together the into one ball. If the dough is kneaded than the flaky texture is lost. Add water as needed. Keep in mind to combine to a firm dough and not a soft dough. Cover the dough and keep aside for 30 mins.
Assembling and Rolling
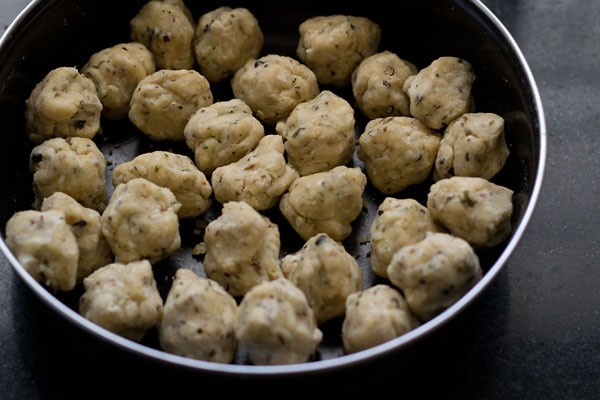
5. Now heat oil as required for deep frying in a kadai (wok) or frying pan. Pinch small balls from the dough. Just roll them lightly in your palms to make them even. No need to give them a proper round shape etc. 6. Flatten each ball with a rolling pin to medium thickness. Prick each mathari with a fork or give cuts with a knife. This makes sure that they do not puff up while frying. The jagged uneven edges are alright and this is how they are meant to be. In case you want a smooth finish, then use a biscuit or cookie cutter. Roll a large piece of dough and cut with a cookie cutter. You can also choose to cut them in triangular shapes or fold into triangles.
Frying Mathri
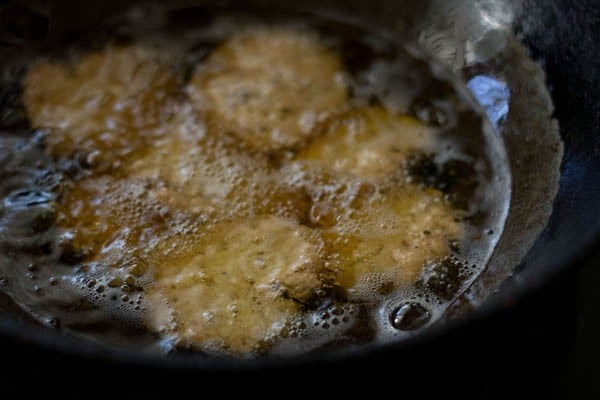
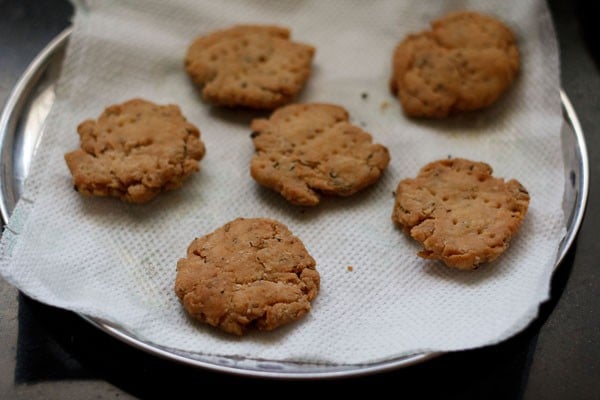
7. Fry about 4 to 6 mathri is medium hot oil till crisp and golden on medium flame. When one side becomes golden, gently turn over and fry the second side. Turn again when the second side is golden. If needed turn over the mathiya a couple of time for even cooking. I have included the frying tips on the hotness of oil in the recipe card instructions below. 8. Drain them on kitchen paper towels to remove extra oil. Fry the mathri in batches this way. Keep the rolled mathari covered with a kitchen towel so that their surface does not become dry. When the fried mathri have cooled at room temperature, then store them in an airtight box. The shelf life for mathiya is long – more than a couple of weeks. But don’t worry about the shelf life as the mathri will get over soon. They are delicious and addictive. For baking mathri in the oven, please check the instructions in the recipe card below. I have listed the details there. 9. Serve mathri with tea or as a snack with a side of mango or lemon pickle. Keep them stored in an air-tight container at room temperature. Please be sure to rate the recipe in the recipe card or leave a comment below if you have made it. For more vegetarian inspirations, Sign Up for my emails or follow me on Instagram, Youtube, Facebook, Pinterest or Twitter. Chakli Recipe (Instant & Easy) Namak Para Recipe | Namak Pare (Salty Diamond Cuts) Gujiya Recipe (Fried & Baked) Balushahi Recipe | Badusha Sweet This Mathri recipe post from the archives (October 2011) has been republished and updated on 1 October 2021.

title: “Mathri Recipe Mathiya Or Mathari " ShowToc: true date: “2024-10-04” author: “Chung Clewis”
About This Mathri Recipe
This recipe is for a traditional Punjabi style mathri which is flaky (khasta in Hindi) and flavored with carom seeds (ajwain), black peppercorns, dry fenugreek leaves(kasuri methi) and cumin seeds. In my recipe I have used both all-purpose flour (maida) and whole wheat flour. Many people like to have these spiced flour crackers having a savory, salty taste with their evening tea or as a snack to munch on. Once made in bulk you can store them in an airtight container at room temperature and enjoy it for the next few weeks. So the shelf life is long. I share here both both fried and baked mathari. For the best crispy and flaky texture, the fried mathri is definitely the winner, but the baked one is good too. They do not become deeply golden like the fried ones and have a faint dense texture. But are good for a low-fat option. The first photo above is of the baked mathiya and the last photo below is of the fried mathri. The baked mathiya are flaky but lesser as compared to the fried ones. I usually make mathri or mathiya for the occasion of Karwa Chauth vrat. In Punjabi families, the ladies break the rigorous vrat or fasting by eating mathri. You can check more about this vrat in this detailed post of Karwa Chauth Vrat Recipes. You can also make this recipe for festivals like Diwali or Holi.
How to make Mathri Recipe
Making Mathri Dough
Before you begin, let me tell you that this mathri recipe makes for 30 pieces, but can be halved to make a smaller portion or doubled to make a big batch. Also keep in mind that if you plan to bake mathri from the entire dough, then consider adding 1 to 2 tablespoons more oil or ghee to the flours.
- First heat 3 tablespoons ghee or oil until hot. Take the hot ghee or oil (known as “moyen” in Punjabi language) and the following dry ingredients in a large mixing bowl:
2 cups all-purpose flour (maida)½ cup whole wheat flour (atta)2 teaspoon carom seeds (ajwain)2 teaspoons black pepper (kali mirch) – crushed coarsely or kept whole2 teaspoons – dry fenugreek leaves (kasuri methi), crushed – optional1 teaspoon cumin seeds (jeera)1 pinch asafoetida (hing) – optional1 pinch baking soda – optional, do add if baking the matharisalt as required
To make masala mathri, you can add a few ground spices like ¼ teaspoon turmeric powder, ½ teaspoon red chilli powder and ¼ teaspoon garam masala powder (optional). 2. First mix everything well with a spoon. Then when the mixture is warm or cool enough to handle, mix the fat evenly in the flour with your fingertips. The whole mixture should resemble breadcrumbs. The more you do this, the more better texture the mathri will have. 3. You will see the mixture can be gathered together like shown in the photo below. When you hold this mixture in your fist, it should not crumble and form a lump. If you get at this stage, then move to the next step. 4. Add 1 or 2 tablespoons of water each time and mix it. Combine the water with the flour mixture and mix only. Don’t knead like a roti or poori dough. Only mix the water in the dough and bring it together. Make a firm dough (like in the photo below) and not a soft one. I have used 6 tablespoons water and this amount was enough to bind and bring together the into one ball. If the dough is kneaded than the flaky texture is lost. Add water as needed. Keep in mind to combine to a firm dough and not a soft dough. Cover the dough and keep aside for 30 mins.
Assembling and Rolling
5. Now heat oil as required for deep frying in a kadai (wok) or frying pan. Pinch small balls from the dough. Just roll them lightly in your palms to make them even. No need to give them a proper round shape etc. 6. Flatten each ball with a rolling pin to medium thickness. Prick each mathari with a fork or give cuts with a knife. This makes sure that they do not puff up while frying. The jagged uneven edges are alright and this is how they are meant to be. In case you want a smooth finish, then use a biscuit or cookie cutter. Roll a large piece of dough and cut with a cookie cutter. You can also choose to cut them in triangular shapes or fold into triangles.
Frying Mathri
7. Fry about 4 to 6 mathri is medium hot oil till crisp and golden on medium flame. When one side becomes golden, gently turn over and fry the second side. Turn again when the second side is golden. If needed turn over the mathiya a couple of time for even cooking. I have included the frying tips on the hotness of oil in the recipe card instructions below. 8. Drain them on kitchen paper towels to remove extra oil. Fry the mathri in batches this way. Keep the rolled mathari covered with a kitchen towel so that their surface does not become dry. When the fried mathri have cooled at room temperature, then store them in an airtight box. The shelf life for mathiya is long – more than a couple of weeks. But don’t worry about the shelf life as the mathri will get over soon. They are delicious and addictive. For baking mathri in the oven, please check the instructions in the recipe card below. I have listed the details there. 9. Serve mathri with tea or as a snack with a side of mango or lemon pickle. Keep them stored in an air-tight container at room temperature. Please be sure to rate the recipe in the recipe card or leave a comment below if you have made it. For more vegetarian inspirations, Sign Up for my emails or follow me on Instagram, Youtube, Facebook, Pinterest or Twitter. Chakli Recipe (Instant & Easy) Namak Para Recipe | Namak Pare (Salty Diamond Cuts) Gujiya Recipe (Fried & Baked) Balushahi Recipe | Badusha Sweet This Mathri recipe post from the archives (October 2011) has been republished and updated on 1 October 2021.
